This is a typical circuit, click link for printable copy.
By now you will have done a few takeoffs and
landings with your instructor as you flew the aeroplane to
complete all of the air exercises. Now it's time for you to
polish up your takeoffs and landings by completing many circuits
of the aerodrome.
You will learn several ways to takeoff and to land, and I'll
write about these in later lessons. For this lesson however, we
will stick to simple fundamentals, the wind is straight down the
runway, and is only five knots! Perfect for our introduction to
the circuit.
The Circuit
Since there are no paved and marked roads in
the sky, aviators need a specific pattern to fly around an
aerodrome such that they know where to look for other aircraft,
and can develop a sequence for landing with consideration to
others. Without a standard pattern aeroplanes could arrive at a
runway from all directions with the consequent hazard of hitting
each other... not recommended!
The circuit has been standardised throughout the World, a circuit
flown in Canada is no different to one flown in Europe. There are
variations on the circuit depending on the aerodrome, so it is
always advisable to refer to the Airport directory to ensure
compliance with local requirements, in Canada the relevant book
is the Canada Flight Supplement.
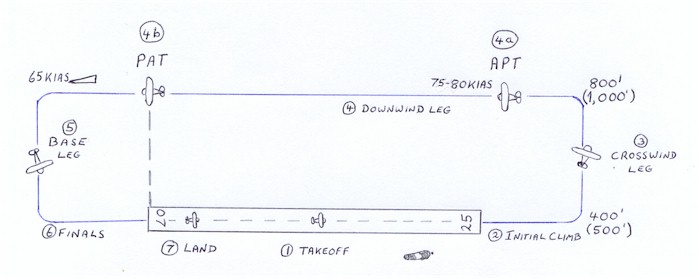
This is a typical circuit, click link for printable copy.
Click here for an image of the Circuit, print off a copy!
Flying a 800 foot circuit in a Cessna 152
First of all we check to see that no
aircraft is on finals for our runway... we may have to turn the
aeroplane on the taxyway to get a better view of the approach.
When clear we line up on the runway centreline. I like to be as
close to the beginning of the runway as practical so as to have
the maximum amount of runway ahead for the takeoff.
Takeoff. Apply full power, and if possible
glance at the RPM, oil pressure and temperature guages, an early
indication of engine trouble may mean aborting the takeoff.
Look well ahead, pick a tree or another landmark at the end of
the runway to keep straight with; today you'll need some right
rudder!
As the speed increases, raise the nose to slightly less than the
climb attitude, do you remember the climb attitude?
As the aeroplane accelerates you will have to move the control
column gently forward to maintain the attitude. If you don't, the
elevator's increased effectiveness will cause the nose to rise
too high.
Climb. When it is ready the aeroplane will leave
the ground, and guess what? If you maintain the attitude you'll
find that you will soon be doing 67KIAS; trim, and check the RPM,
oil pressure + temp.
Attitude + Power = Performance
Crosswind. At 400 feet we
enter a climbing turn to the left through less than 90 degrees,
the nose will be pointed slighty into the wind to ensure our
crosswind leg is at 90 degrees to the runway heading.
Under normal circumstances we will reach 800 feet before turning
down wind using a 30 degree bank, but we may do a climbing turn
at 600 feet to arrive downwind at 800.
Downwind. Attitude Power Trim; Lower the nose to
the cruise attitude, reduce power - 1900 to 2000 RPM, and trim.
Complete your pre-landing checks; you may use the American GUMPS
or the UK's BUMPF.
American Gas Cessna POH: 1. Seats, Belts, Harnesses |
Canadian ? "Bloody hell!" Do something! Oh: It's Geographic eh! Fuel cock, primer, master, Er er er... |
British Brakes, off Comprehensive! |
Pre landing checks, Vital actions, call them out aloud!
At the end of the downwind leg we set the
aeroplane up for the landing... Most books say turn Base at 45
degrees to the end of the runway, this takes judgement!
Personally, the method I've found to work very well is as
follows:
When the wingtip is in line with the end of the runway, throttle
back to 1700 RPM, apply Carb' Heat, and reduce the airspeed to
65KIAS, trim. Don't lose height while slowing down. The aeroplane
is now set up for the base leg.
Base. Turn a little more than 90 degrees onto
Base to adjust for the drift due to the wind.
Now we throttle back in stages, and apply flaps as required. I
prefer to teach landings with 20 degrees of flap initially; you
get a nice stable approach in this configuration without a long
'float'.
Finals.Turn onto finals, and aim to land well
into the runway, 1/3 its length usually.
Reduce power in small amounts to arrive on 'short' finals power
off (idle).
Landing.... is a very subjective thing! Your
instructor cannot look through your eyes, he or she can only
suggest where you should look.
Generally you will look in your 11 o'clock region to guage your
height for the flare. The flare is begun around 10 feet above the
runway with the nose rising gradually to the climb attitude at
just a few inches from the runway surface.
This 'hold off' requires patience, look well ahead and hold the
aeroplane off until you get the climb attitude and then maintain
this attitude to touchdown. The stall warner may sound, this is a
good thing! It means that you have landed gently at the minimum
speed.
As the aeroplane rolls out, maintain back pressure on the control
column to keep the weight off the nose wheel. Putting weight on
the nose wheel could cause it to shimmy (wobble) badly at speeds
above the normal taxy.
What are the three most useless commodities?
1. Runway behind you. Use
all of it!
2. Altitude above you. Height is security when
the engine fails.
3. Fuel in the bowser (tanker truck). Petrol
keeps the engine running, take more than enough.
In the next lesson we'll learn several methods for taking off: Crosswind, Short Field, and Soft Field.
© Michael Peare 2001
Next: Lesson 12